Deleatidium mayflies are New Zealand’s most abundant and widely distributed group of stream insects. Being a little more tolerant of agricultural runoff than larger mayfly species, they are found from the headwaters to the estuaries of most rivers and streams. The little clinger nymphs are consequently a staple of many local trout; and therefore frequent targets of selective drift-feeding fish. A good imitation can make all the difference.
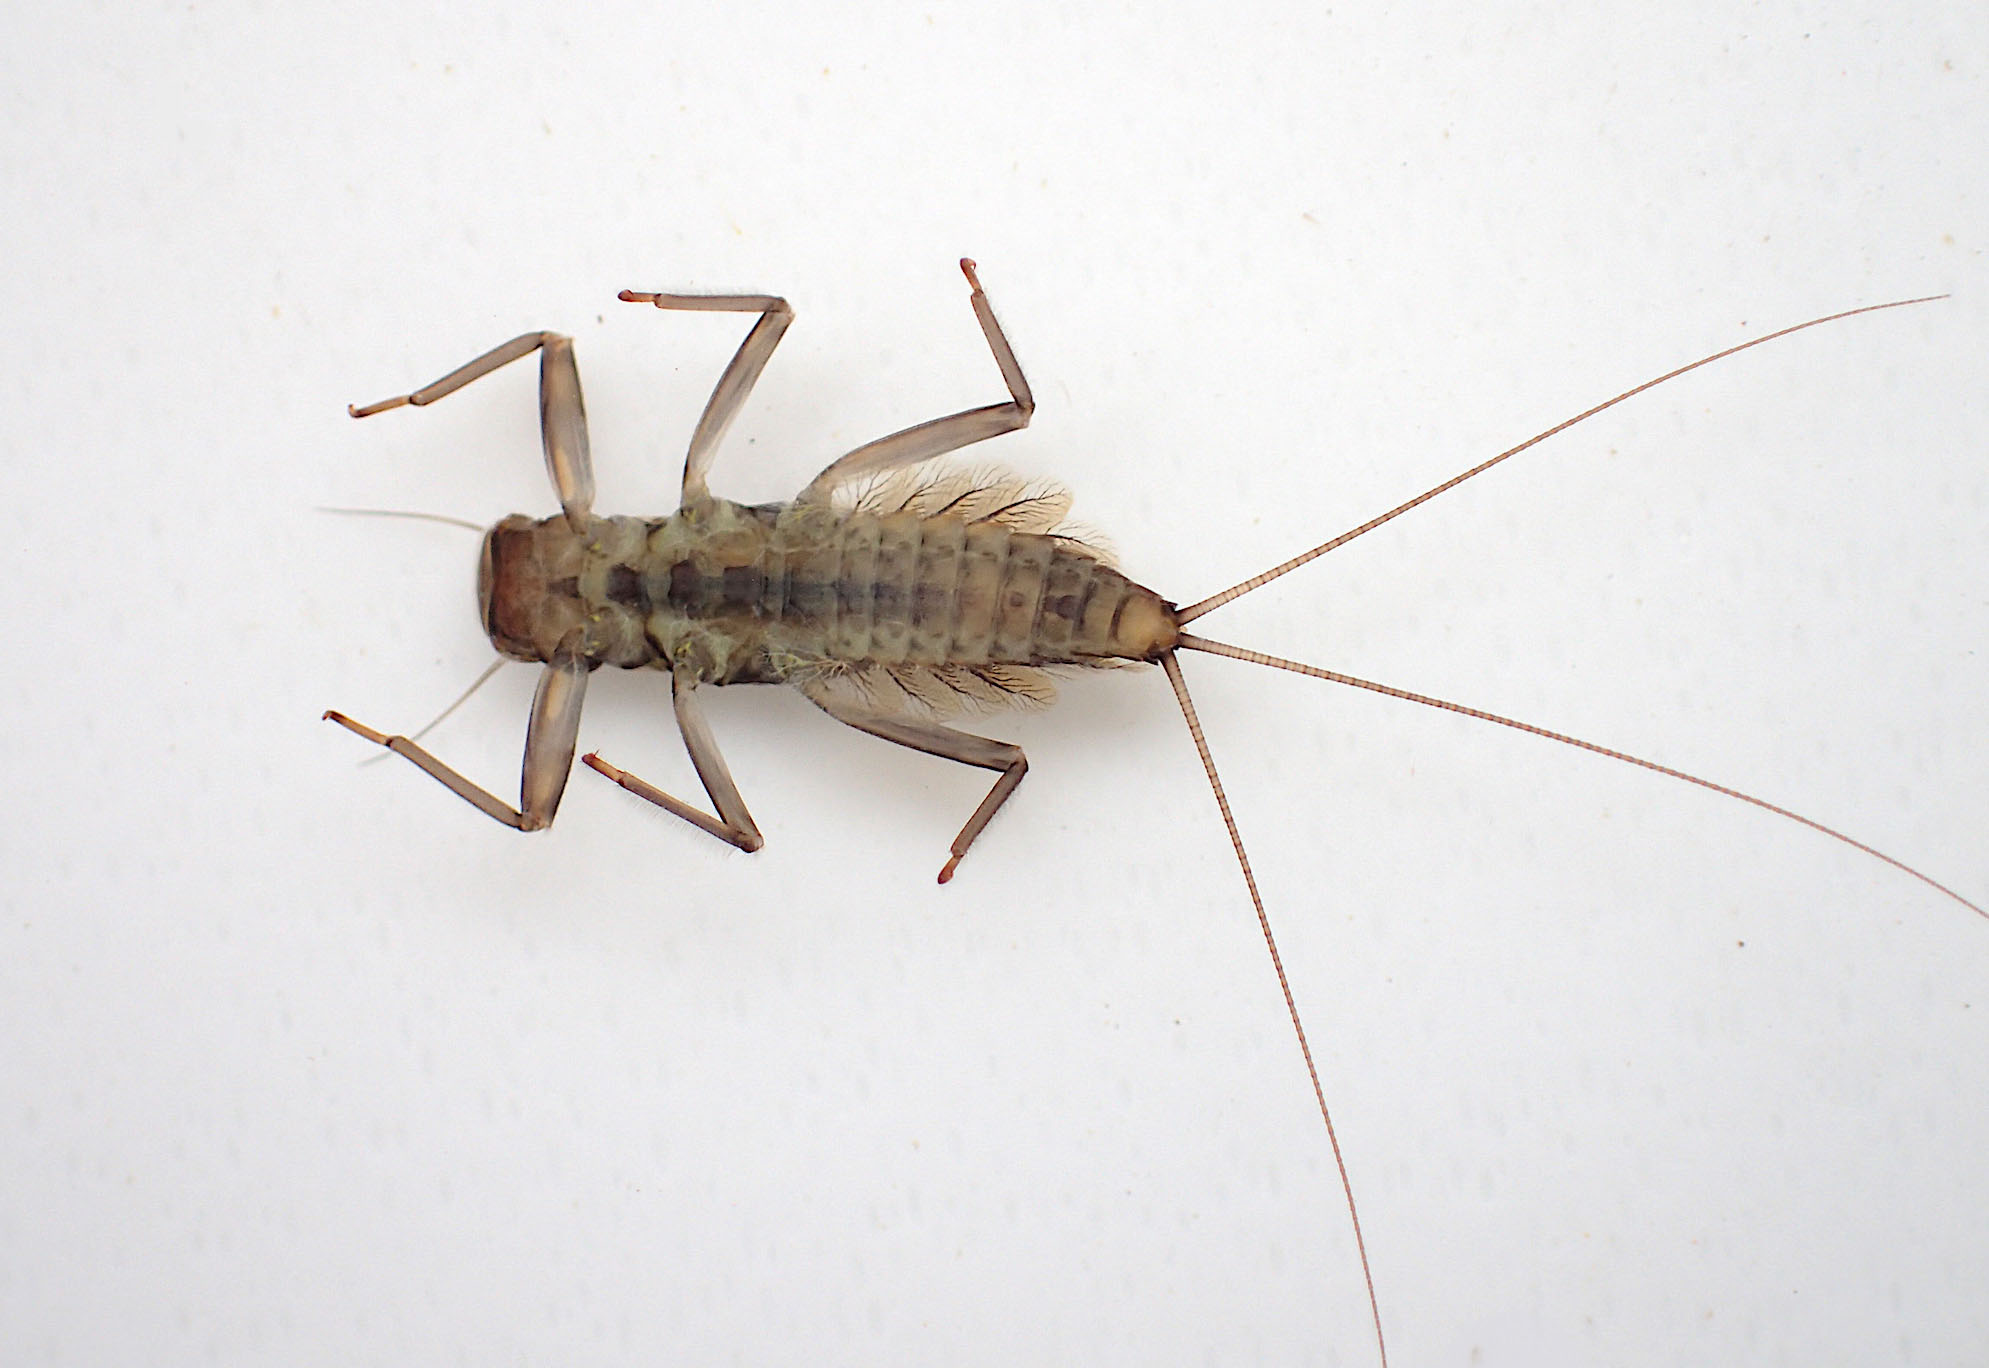
I still remember the first honey jar of Deleatidium nymphs I held up to the light for inspection. It was spring 2003, as the little size 20-16 creatures clung to the sides of the jar, or swam to and from the surface with a rapid dolphin swimming action, I was struck by their broad flat heads and their translucency. Most were fairly pale and mottled, either an amber-brown or grey-black colour, with one or two mature individuals a uniform dark brown.
The natural translucency of their flattened abdomens was greatly enhanced by a row of large yellowish, tan or grey leaf-like gills along each flank; and the robust flattened legs appeared similarly to glow.
Realistic imitation seemed impossible, with the best I could manage being a Pheasant Tail Nymph (PTN) variant with soft hackle legs and frosted amber glass bead heads to imitate translucency. These PTNs did not match the naturals at all well and after two or three fish the tails were all but gone and the wing cases were coming apart.
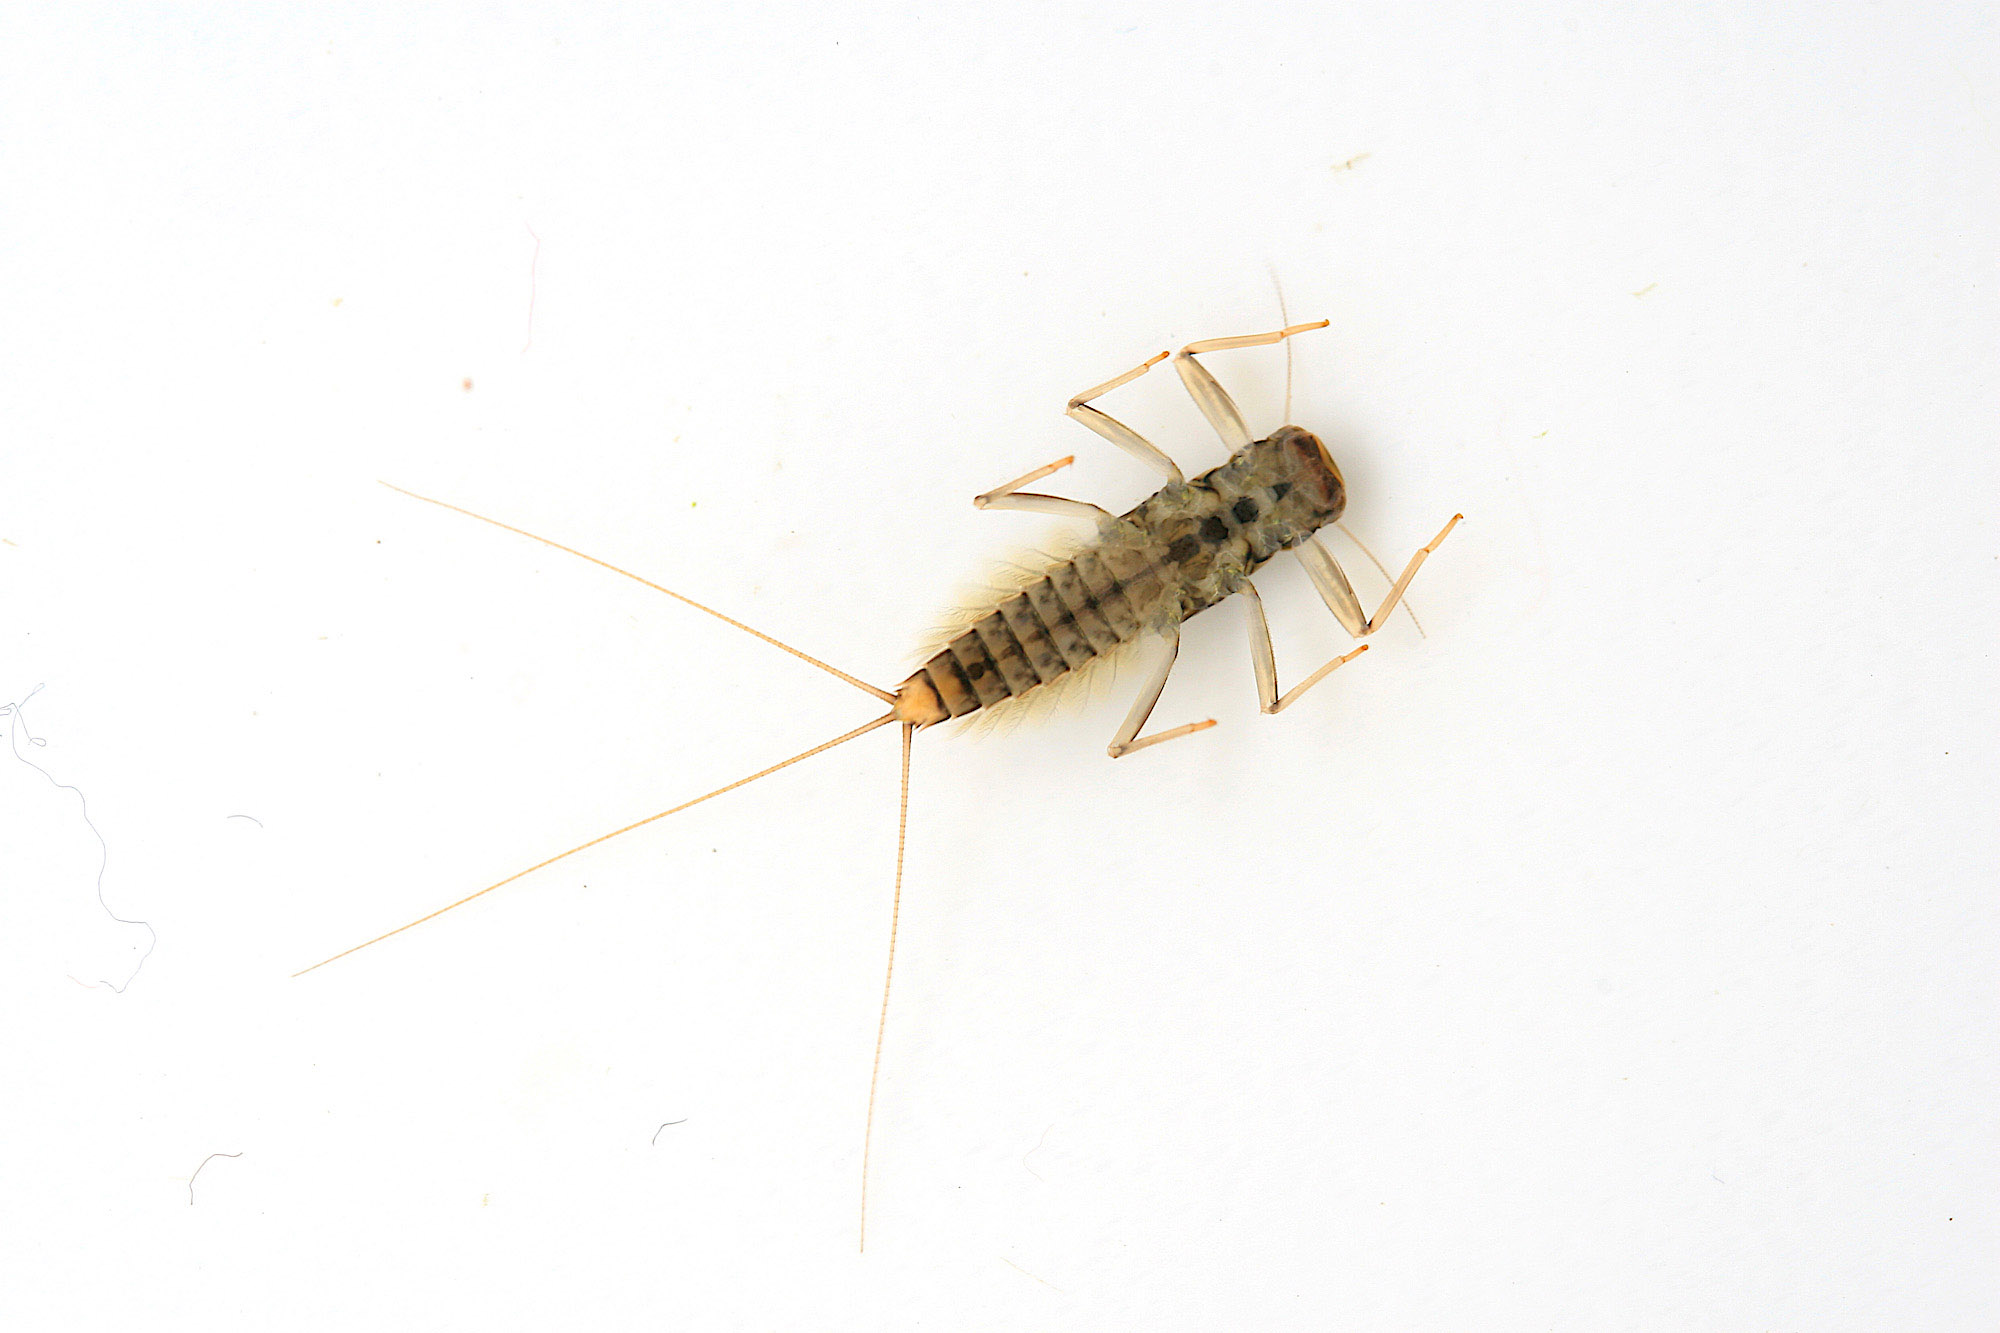
 Deleatidium fumosum nymphs from the middle reaches of the Waikanae River on the lower North Island darken with maturity. The ventral surfaces of the mature nymphs of the brown form are unusually dark.
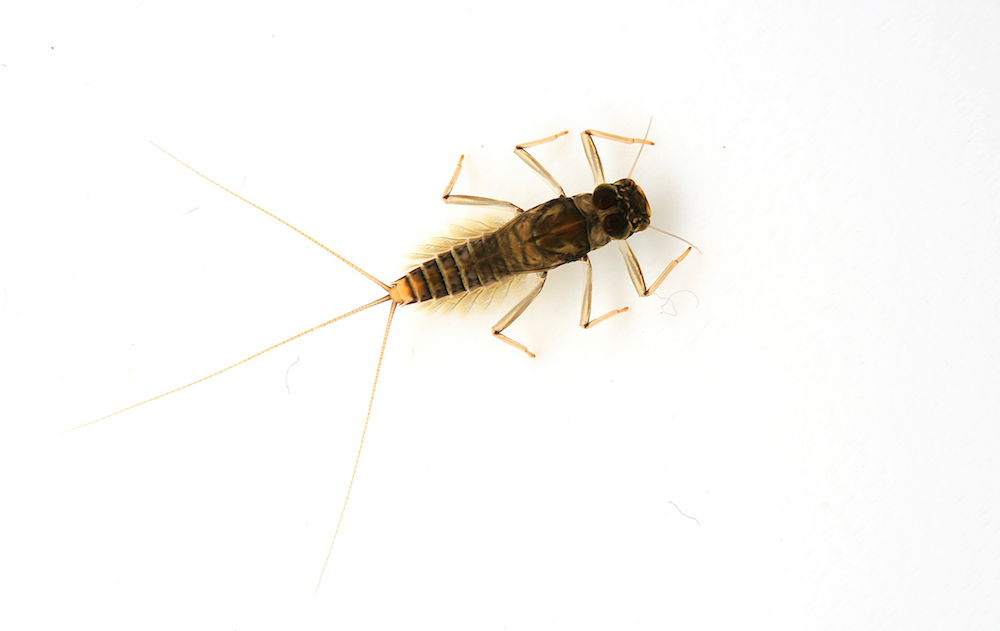
Dorsal (top/above) surface of the grey/black form of Deleatidium autumnale
Ventral (bottom/underneath) surface of the grey/black form of Deleatidium autumnale
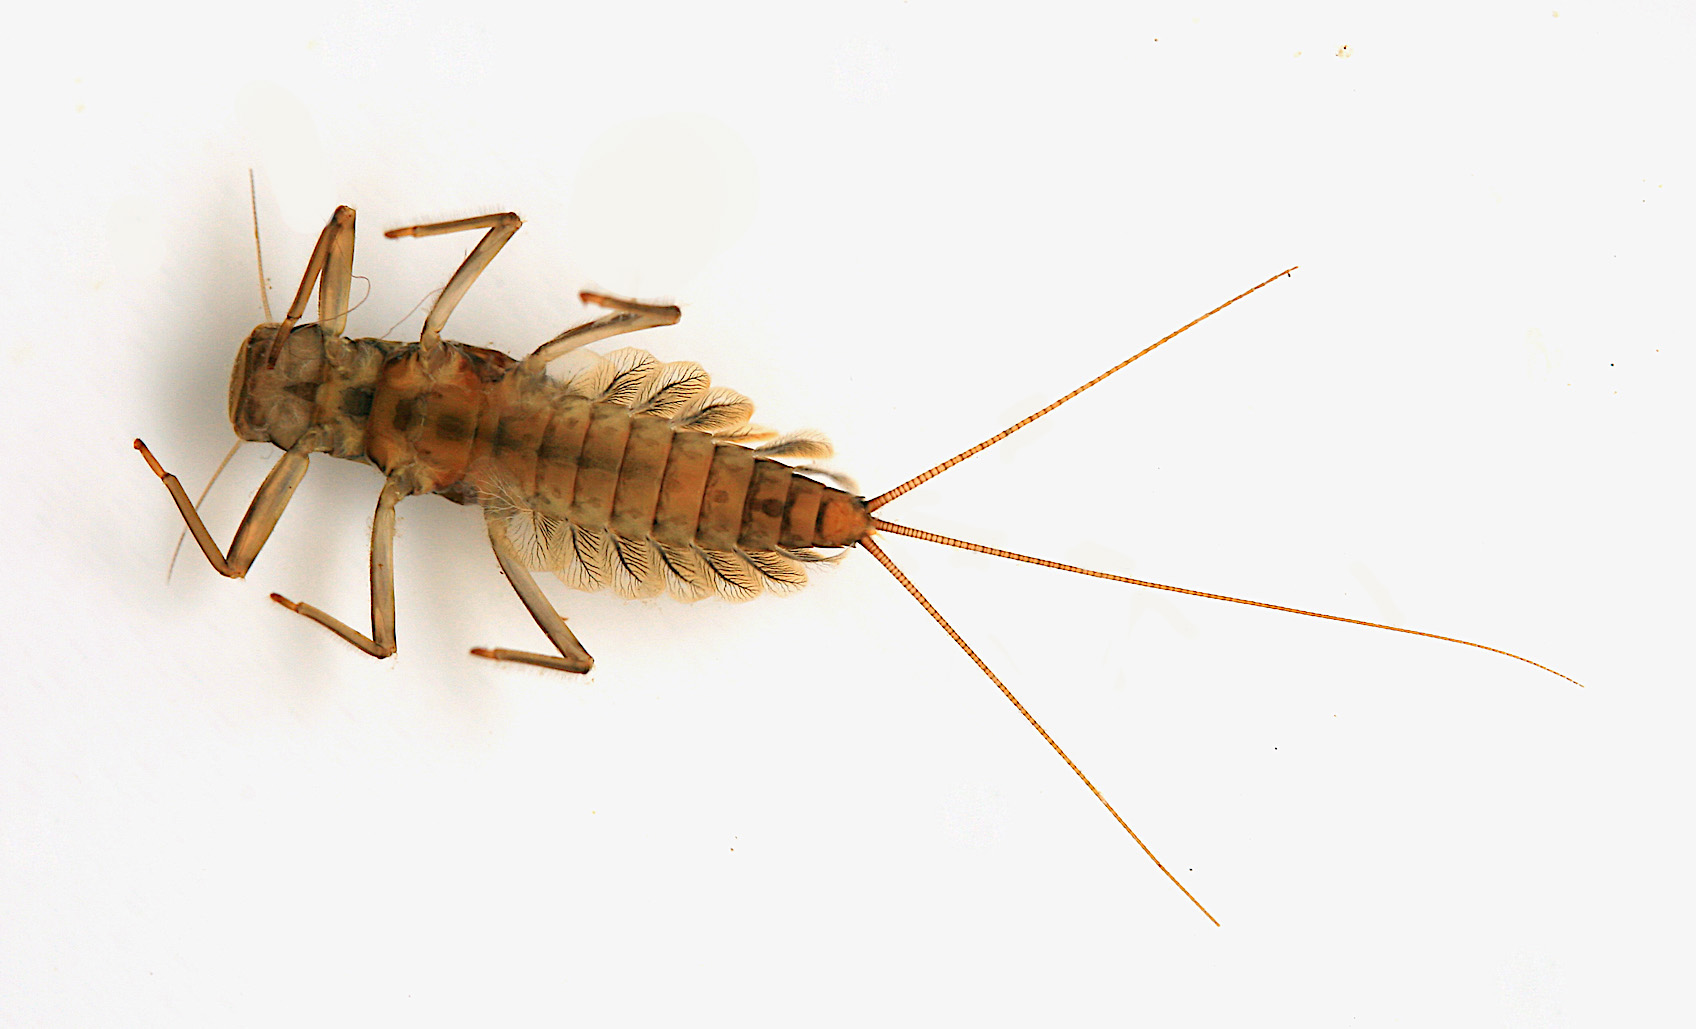
Ventral surface of amber/brown form of Deleatidium myzobranchia from the Waikanae River
Ventral surface of grey/black form of Deleatidium myzobranchia from the Waikanae River
Evolution of the Jelly Crimp Nymph
My first breakthrough on the path to better clinger nymphs came with discovering I could use crimp beads to imitate their broad, flat heads; and construct realistic and durable wingcases from synthetic ribbon coated with superglue.
Having extensively tested Crimp Nymphs with coloured copper wire and turkey-tail abdomens I published an article, "Crimp Nymphs”, in volume 51 of FlyLife (Autumn 2008). Although these patterns did have the colour and flattened shape of clinger nymphs, they failed to effectively imitate the translucency of the natural, especially their flattened abdomens. The design was nevertheless a lot more durable and effective than the PTN.
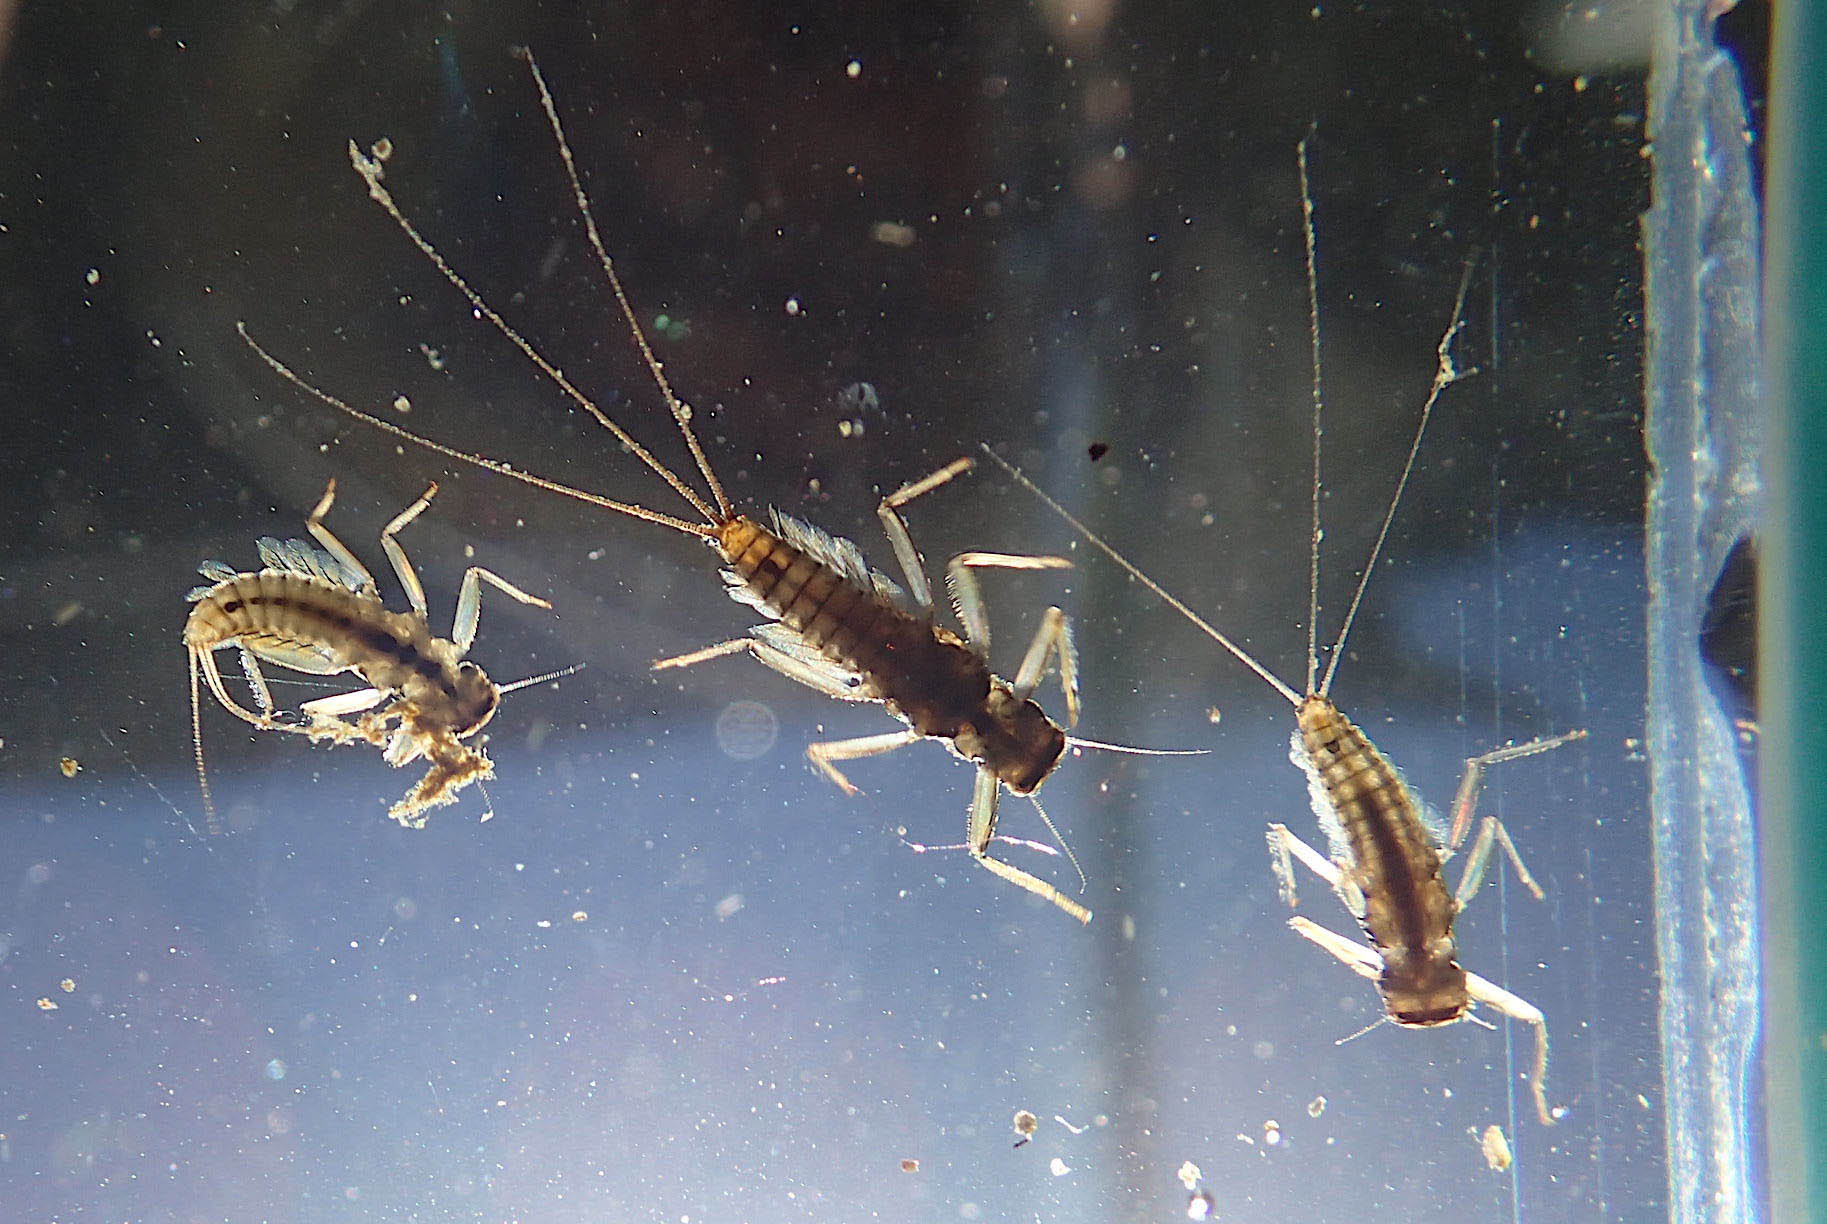
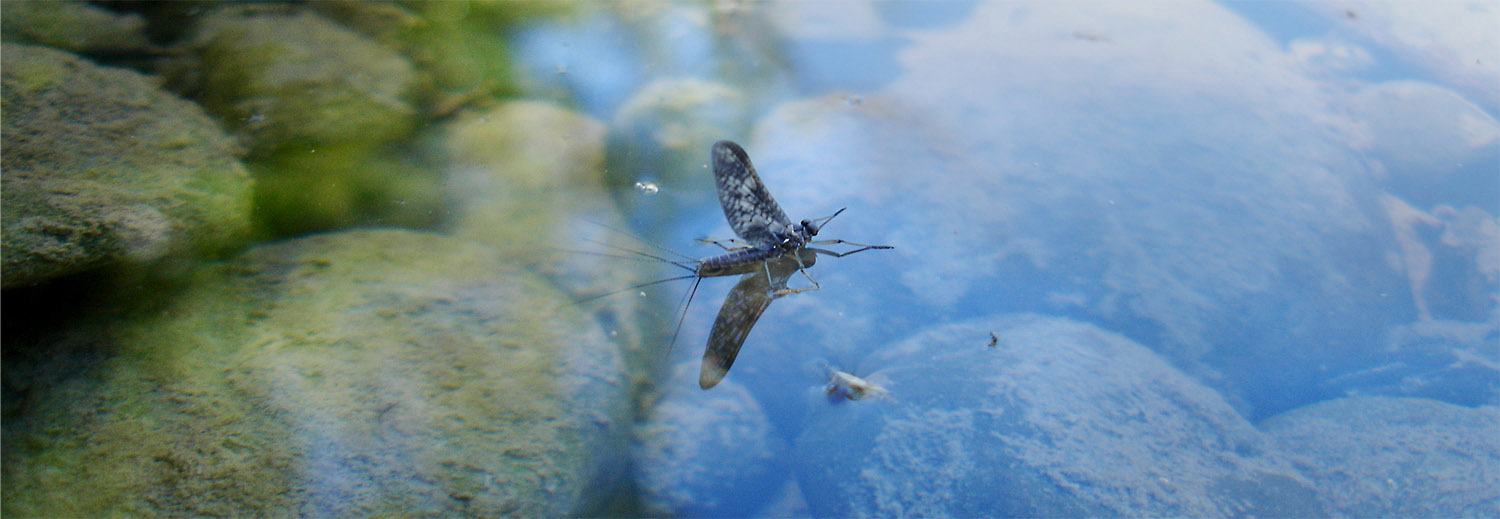
To demonstrate the translucency and glow of Deleatidium nymphs, two immature nymphs and one grey/black mature nymph were placed in a glass fish tank, positioned a foot below the surface of a North Island stream, then photographed from below using a waterproof camera to simulate a trout’s view of suspended food.
I had almost made peace with the lack of translucency in my Crimp Nymphs, when reports by other anglers of dramatic success with simple Stretch Cord patterns on difficult trout fuelled a long held suspicion. Translucency, and associated sparkle and glow, is a key trigger for trout discriminating between small aquatic insects and drifting flotsam. Small clinger nymph imitations lacking this quality were therefore likely to be handicapped in certain situations, depending on the angle of the light.
My second breakthrough was, in 2009, when discovering that Salley Hansen’s Hard as Nails adheres tenaciously to Stretch Cord, which meant it could be used to fix marker-ink colouring.
When I dunked the first batch of amber/brown Jelly Crimp Nymphs in a glass of water, I had before me the most realistic clinger nymph imitation I could have imagined. Their translucent abdomens glowed amber with flashes of yellow and, given the fibre-optic properties of Stretch Cord, the colours of the shell-back were transmitted to other parts of the abdomen.
Although the JCN is modelled on New Zealand’s Deleatidium mayflies, this pattern also imitates other mayfly and stonefly nymphs with flattened translucent abdomens; e.g. mayfly clinger nymphs of the Family Heptageniidae, of which the March Browns are well known examples.
Tying the Jelly Crimp Nymph
Choice of hook for the JCN is largely limited to models of suitable size, shape and wire thickness that allow the crimp bead to fit snugly over wraps of 0.015” or 0.020” lead wire. I like the TMC 2302 as it is realistically curved and has better holding power than straight shank nymph hooks of equivalent dimension.
The Daiichi 1760 is a heavier version of the TMC 2302, and is an excellent small-fly (i.e. #18 and #16) hook for large fish, as it is less prone to opening than the 2302. The 1760 is also available in size 18, a common size for New Zealand’s clingers. As the 1760 is made from thicker gauge steel wire, it is necessary to use thinner lead wire (i.e. 0.015” instead of 0.020”) in order to accommodate the equivalent sized crimp beads on size 16 and 14 hooks.
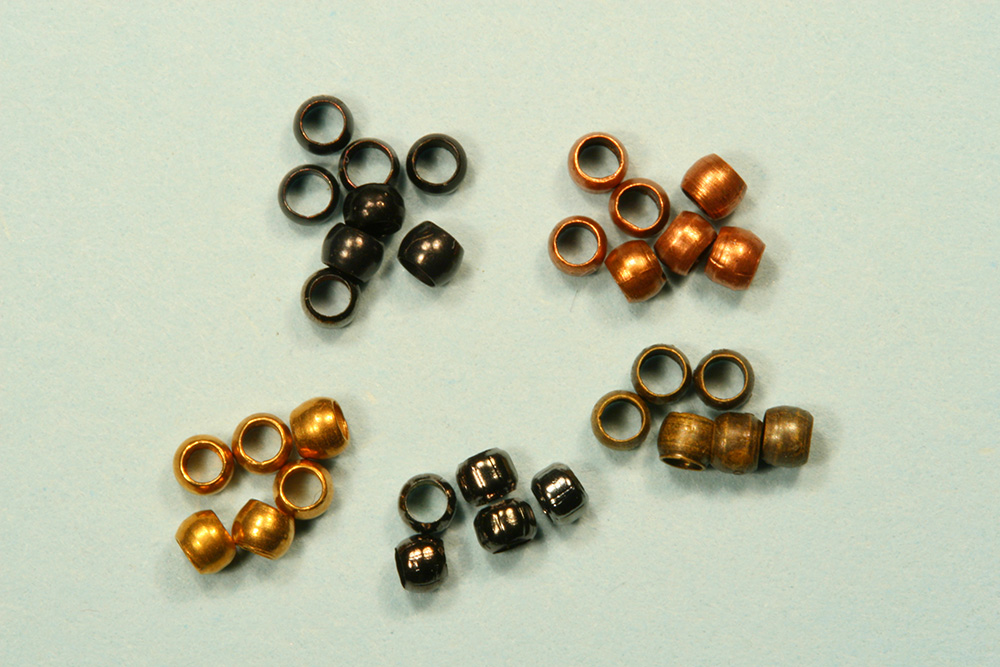
Crimp beads are used for making jewellery and are available from bead and craft suppliers (including online stores) in a range of colours: including gold, copper, silver, gunmetal, black, antique copper, and antique bronze. Most of my crimp nymphs are tied using crimp beads marketed as having an external diameter of 1.9-2.0mm.
As diameter may vary by as much as 0.2mm, I purchase “1.9-2.0mm” crimp beads from several suppliers (fortunately they are as cheap as chips) and grade them small or large, depending on whether they fit snugly over 0.015” or 0.020” lead wire on a #16 TMC 2302 hook. When using Daiichi 1760 hooks, the smaller crimps are best for #18 and the larger ones for #16 nymphs.
Stretch Cord is an elastic polyurethane monofilament, also manufactured for the bead and jewellery industry, and is available in a wide range of translucent colours and diameters. For more on this useful product, see Introduction to Stretch Cord.
The Salley Hansen nail polish does lift the marker ink, due to the isopropanol solvent. If the varnish is applied to the Stretch Cord abdomen with just one or two strokes of a tooth-pick, without covering the same area twice, the marker ink does not smear and the varnish dries to produce a wonderfully translucent shell-back of the appropriate colour. The varnish shrinks dramatically as it dries and what initially appears as a clumsy blob of liquid, will dry to form an indiscernibly thin coat.
The ink from some black permanent markers (e.g. Pantone) is not as opaque and is more easily dissolved by the Salley Hansen’s than that of others (e.g. Sharpie). I therefore use Pantone markers when I want a translucent coating (e.g. the sides of the abdomen of the black/grey JCN) and Sharpie markers when I need more opacity (e.g. the dorsal surface of the abdomen).
Fishing the Jelly Crimp Nymph
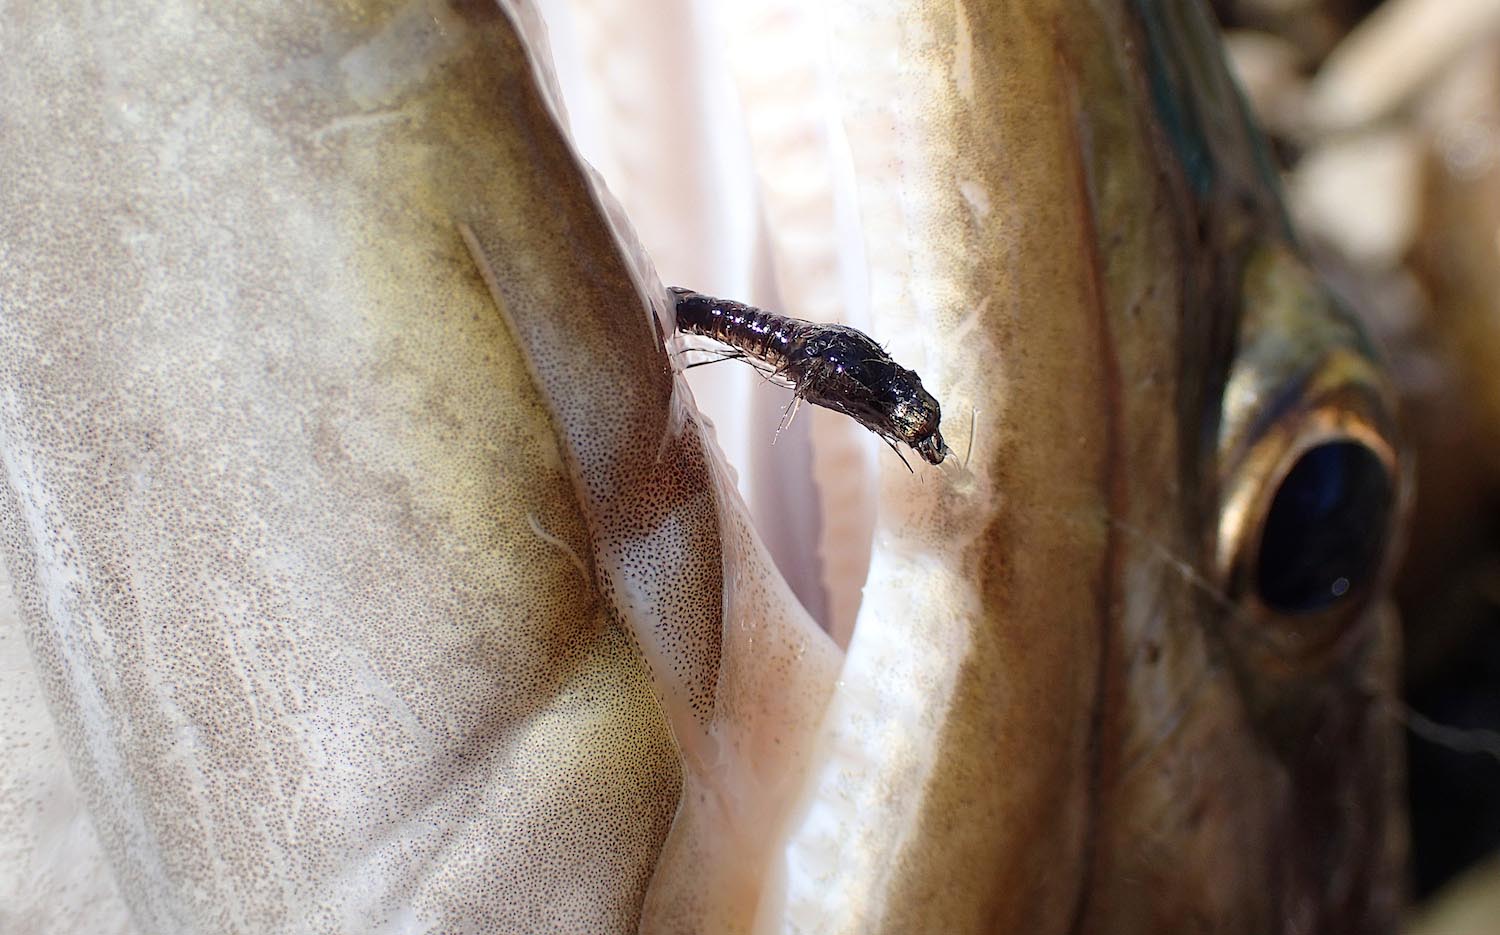
Jelly crimp nymphs (JCNs) in both amber/brown and grey/black have been highly effective on trout throughout New Zealand, from back country streams to the Tongarriro River, in tough, clear summer conditions.
JCNs are the perfect weight to fish below a dry fly in pools and riffles, and also work well behind a heavier tungsten bead nymph for deeper fish. Most common Deleatidium species have grey-black and amber-brown forms, even within the same river or stream. The grey-black form usually has a distinct yellow- orange spot on the terminal/last abdominal segments, and the under surface is whitish grey. The ventral surface of the amber-brown form is typically pale amber but in some species can be medium brown in the final stage before emergence.
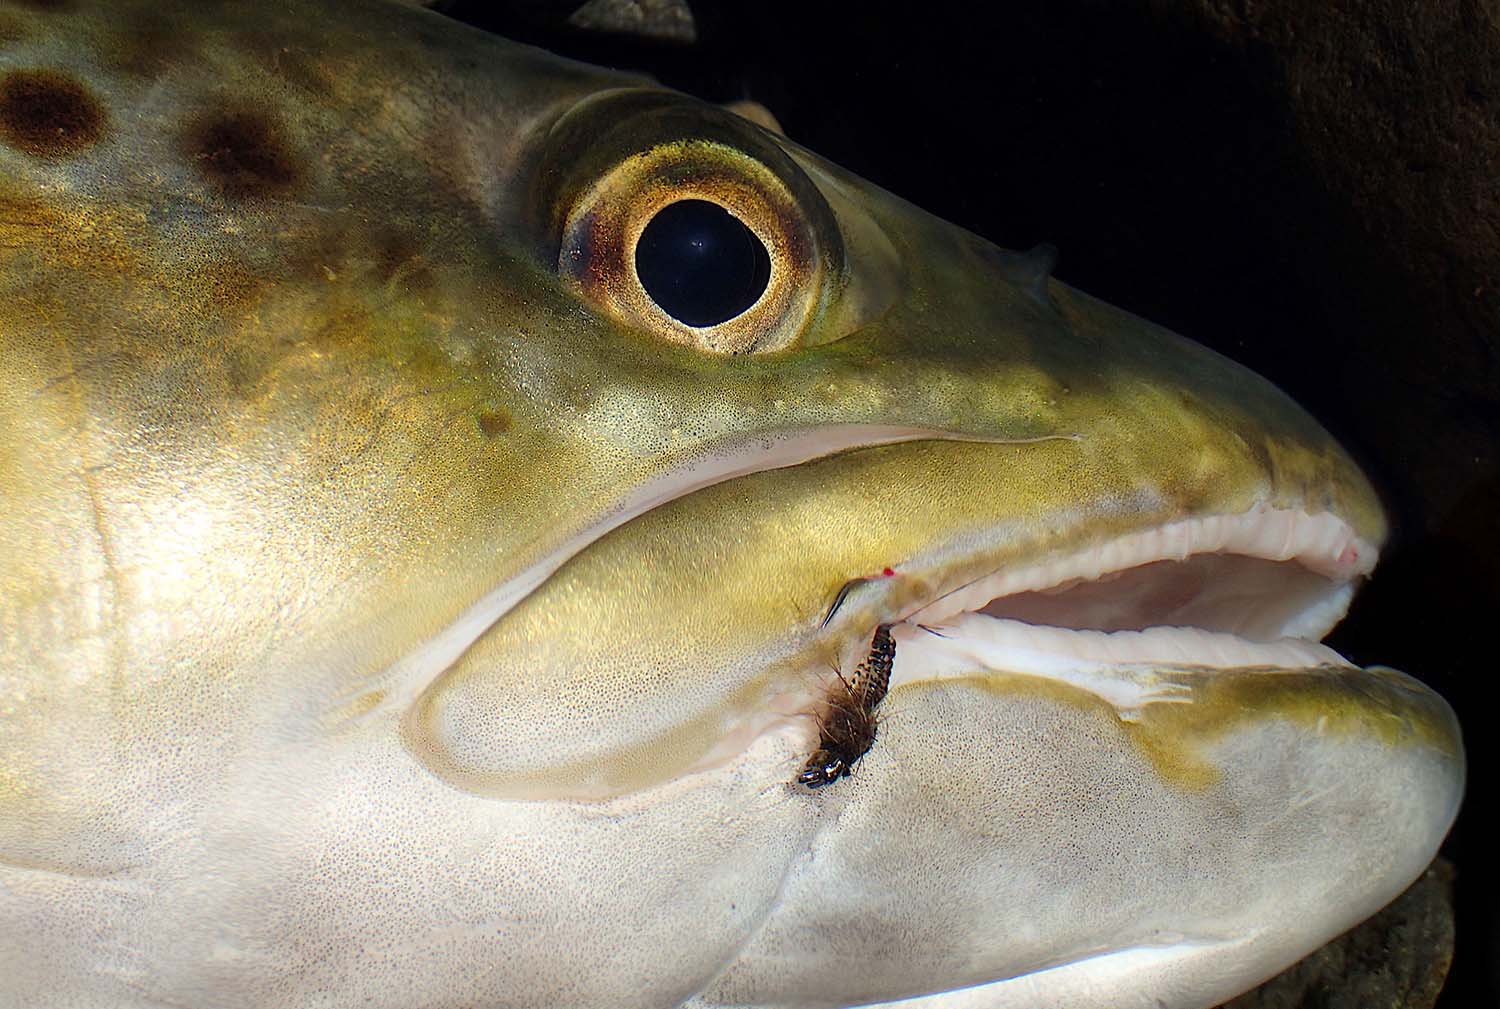
New Zealand trout rise noticeably higher in the water column to intercept the amber and grey/ black versions of the jelly crimp nymph, than they will for versions with dark brown stretch cord, wire, or turkey tail abdomens.
As size and form are identical, one can only attribute this observation to the translucent, glowing abdomens of the amber and black/grey JCNs; which look their best when viewed from below.
Perhaps glowing abdomens result in flies being visible from a greater distance, or maybe the translucency convinces trout to invest more energy in “guaranteed” food. Whatever the reason, greater 'pulling power' has three distinct advantages for the angler, especially when using a dry fly/nymph tandem rig:
1) I do not have to change flies as often, either for slightly deeper sighted fish or when prospecting roily runs;
2) presentation does not have to be as accurate - an important consideration for spooky back country browns in mid-summer, which often do not tolerate more than a single cast; and
3) when trout rise to take a nymph, then angle back to the bottom, strike detection is easy and most times results in a solid hook up.
All of which mean more fish landed when using the JCN.
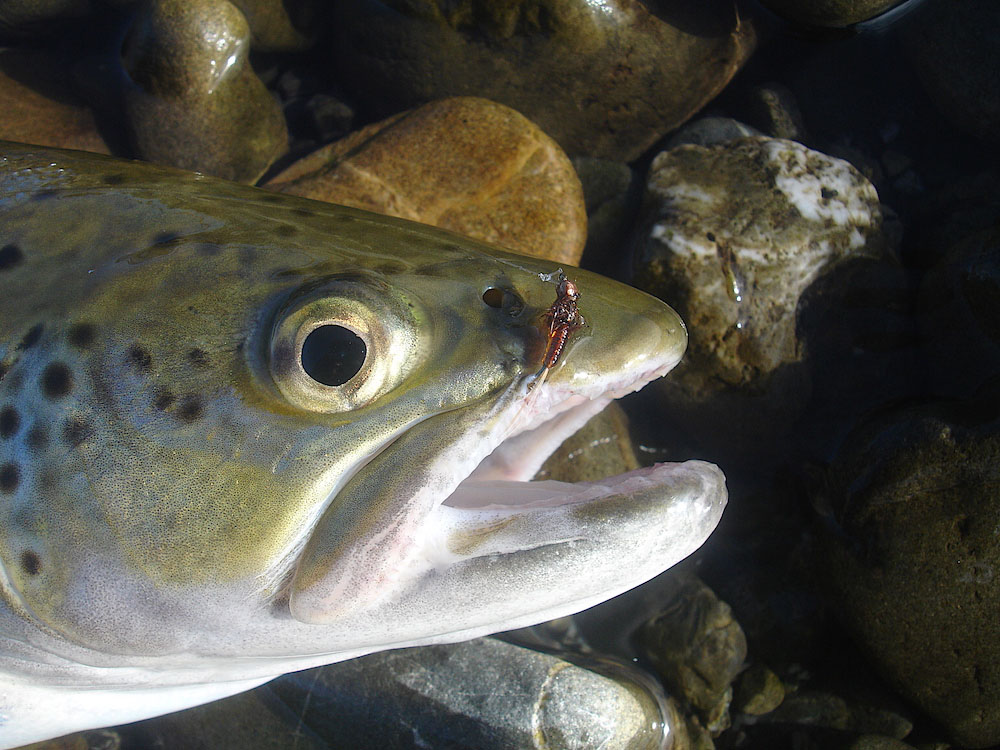
Amber/brown and grey/black Crimp Nymphs have been effective on New Zealand trout all over the country, particularly in difficult summer conditions.
Jelly Crimp Nymph Recipe – sizes 18-16
Originator: Marc Griffiths
Hook: Daiichi 1760 #18-16, TMC 2302 #16
Thread: 70 denier, colour to match natural
Under thorax: Lead Wire; 9 turns 0.015” for size 18; and 8 turns 0.020” or 10 turns 0.015” for #16.
Head: Flattened 2mm Crimp
Tail: Six to eight cock hackle fibres, colour to match natural
Abdomen: 0.5-0.6mm Stretch Cord of appropriate colour; upper surface coloured with suitable permanent marker and then coated with Sally Hansen’s
Wing Case: Kreinik ribbon, 1/16”
Thorax and legs: Squirrel dubbing (or Hare’s mask for #18).
Note: See Colour Chart for common colour combinations.
Thickness of lead wire (above) depends on hook model and internal diameter of crimp bead.
Colour Chart for imitating common clinger nymphs
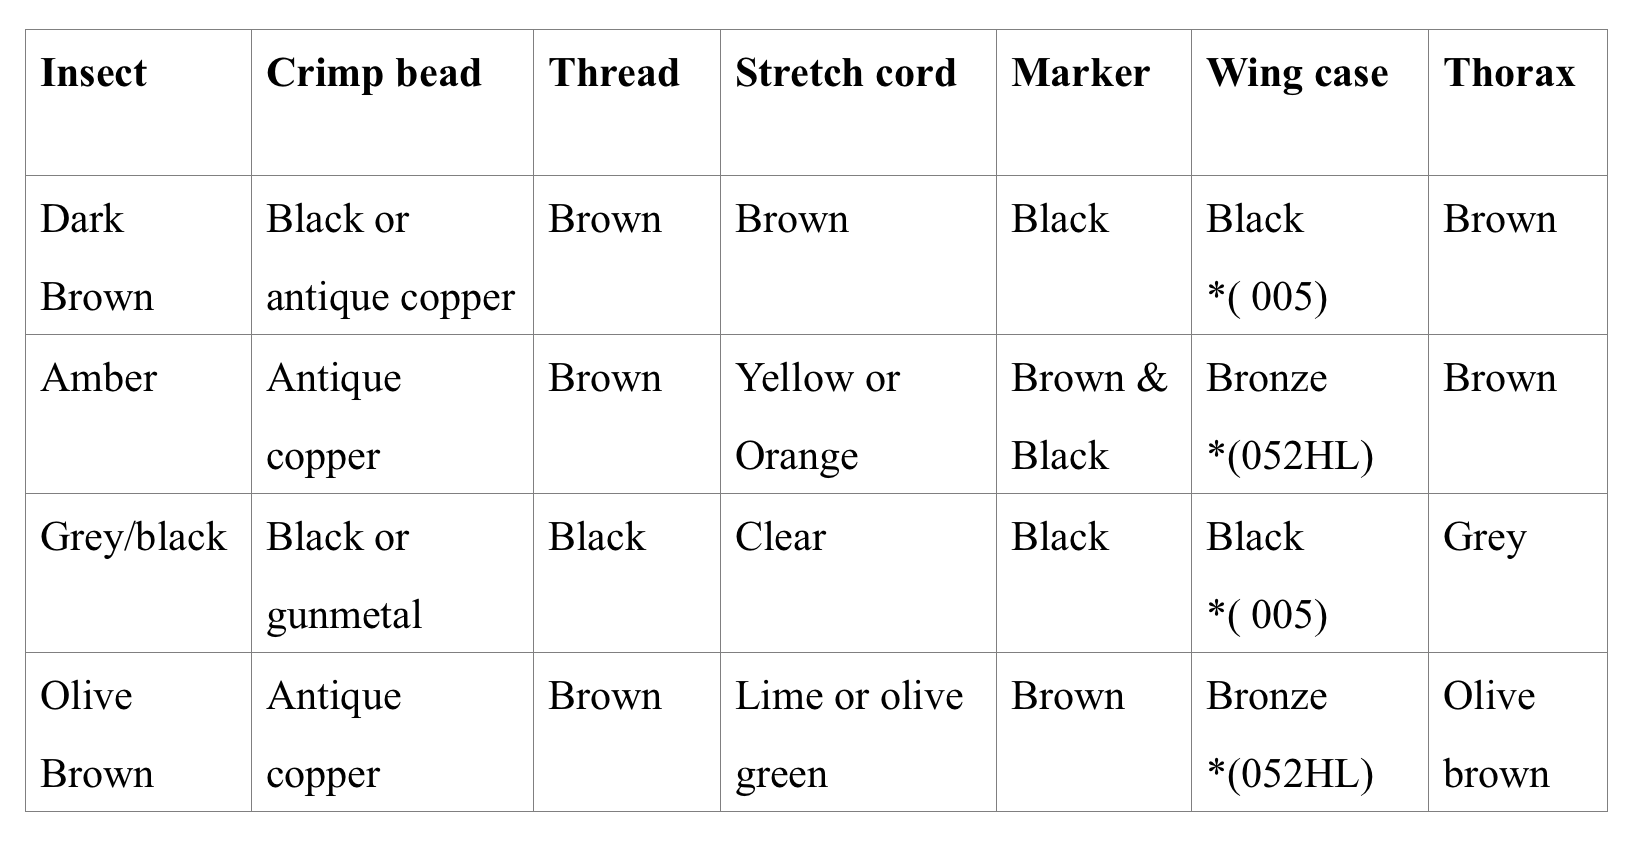
* Colour code for Kreinik ribbon. Although Code 052HL is called “bronze”, it is really a metallic brown, especially once coated with super glue.
Tying Steps
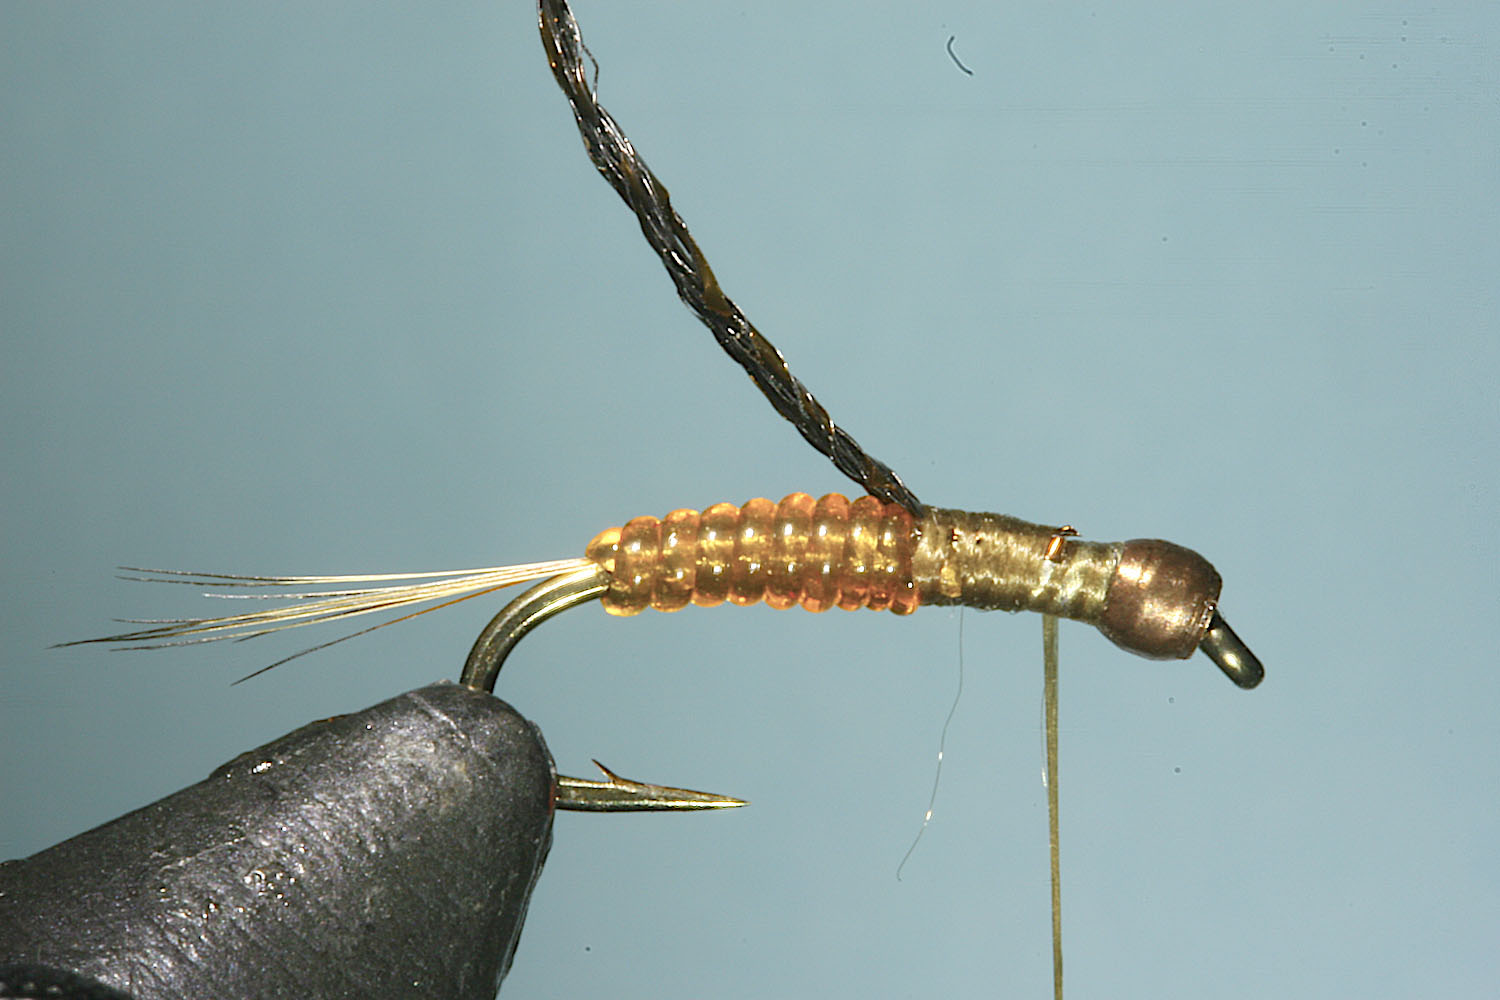
Step 1
Cover the front half of the hook shank with lead wire, using the number of turns specified in the recipe.
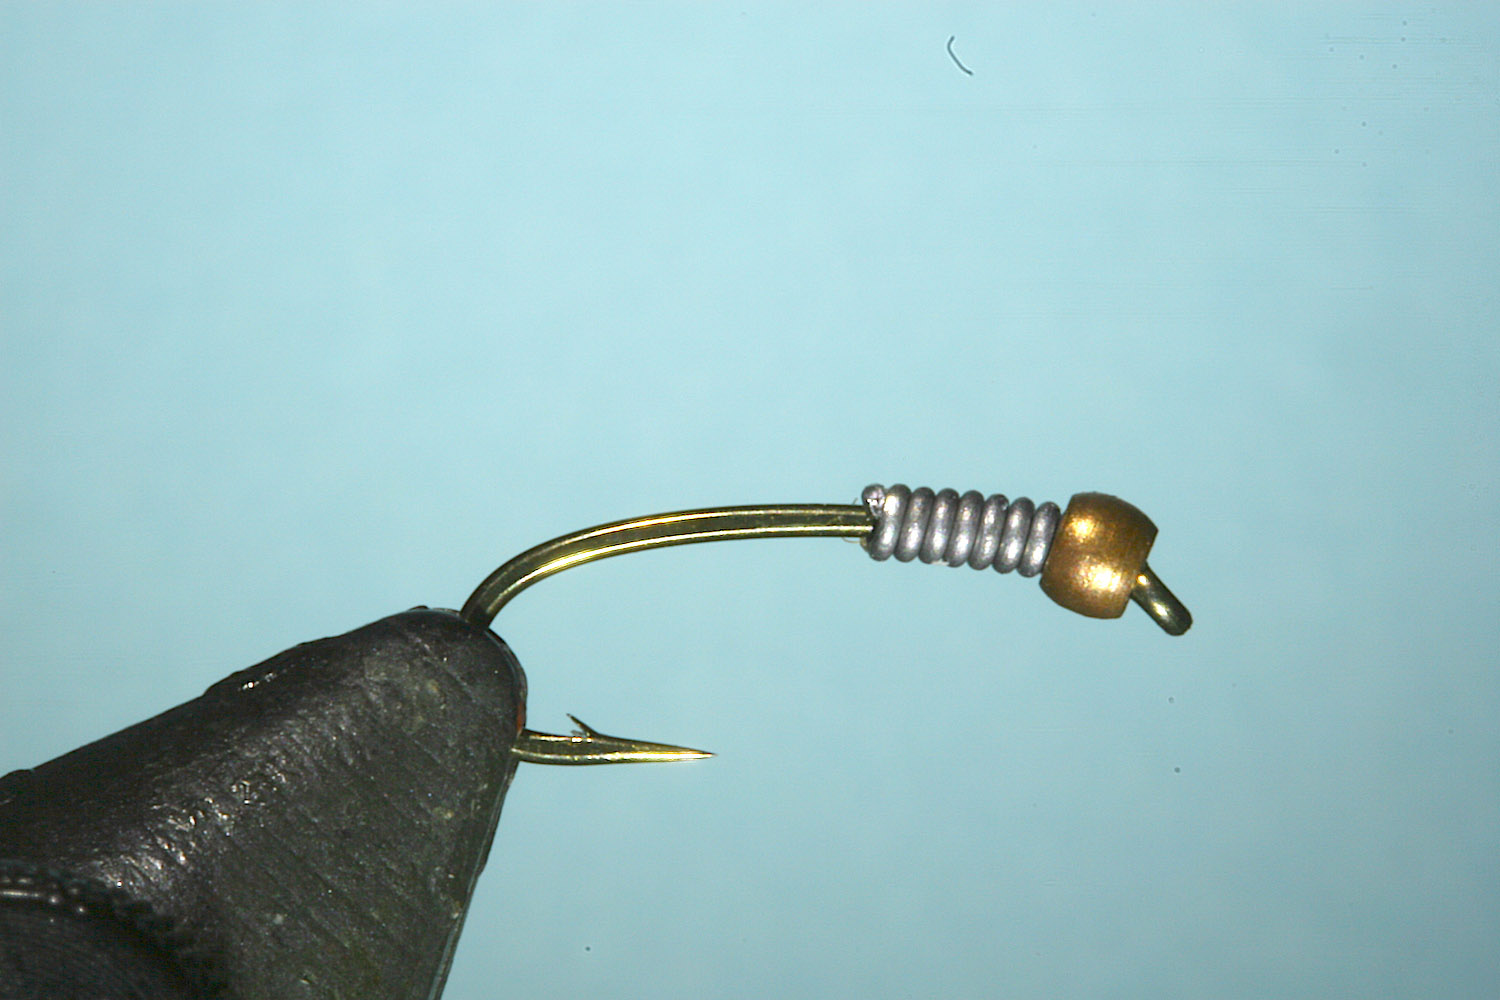
Step 2
Slip the crimp bead over the hook point then onto the lead under-thorax, to a position just behind the eye.
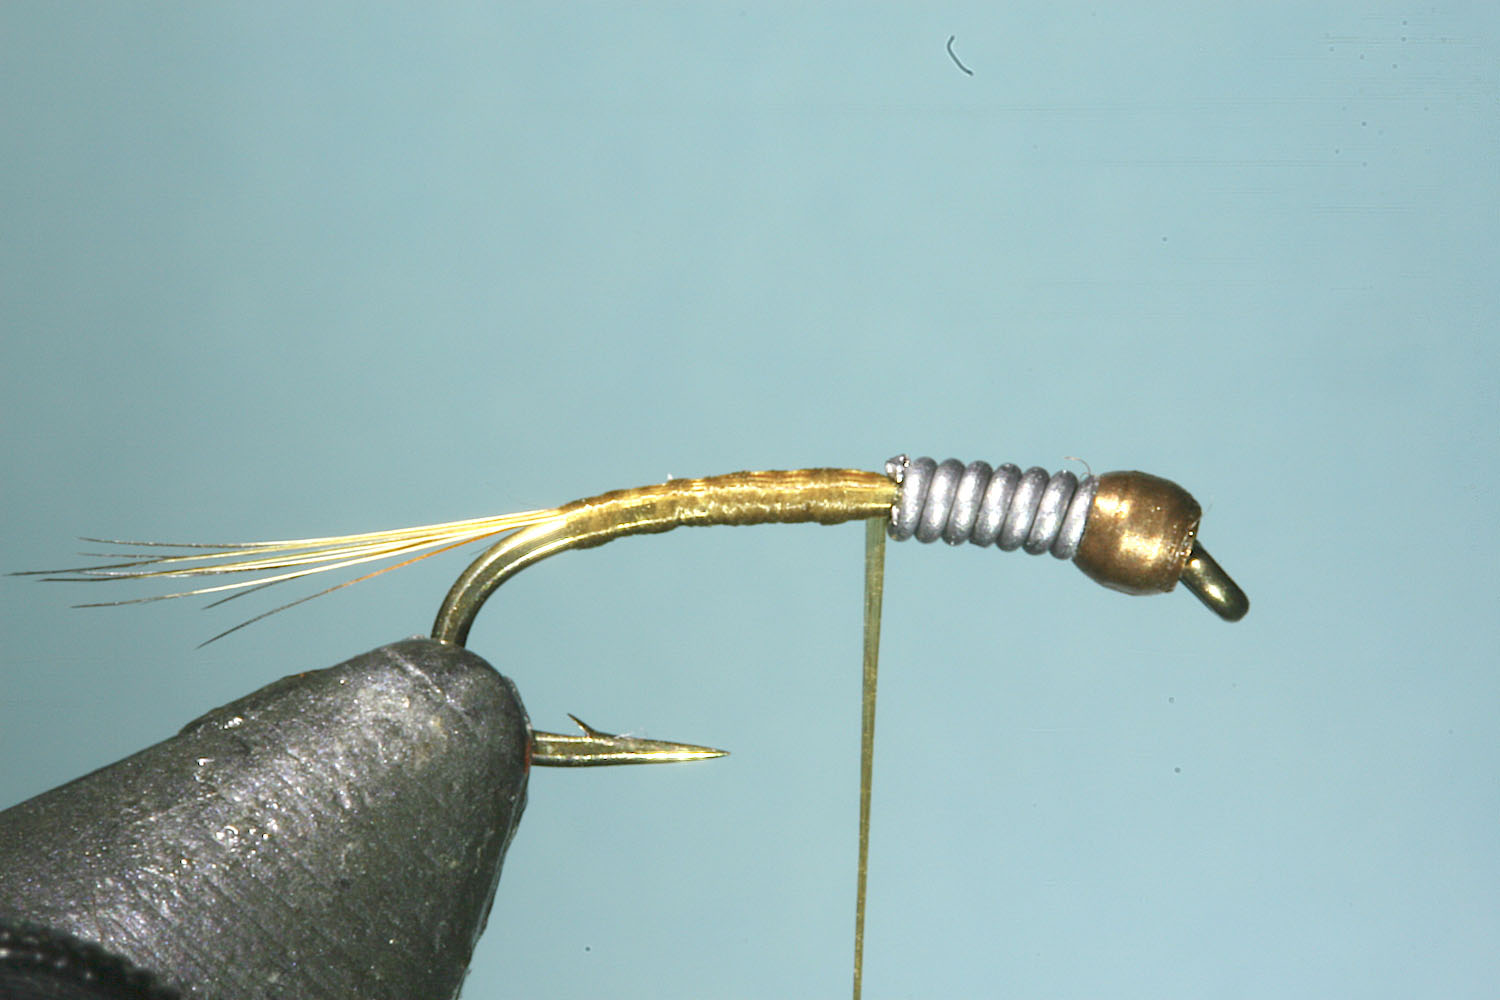
Step 3
Tie in the tail fibres to a position just above the barb. Slide the crimp bead rearward a few mm, place a drop of super glue on the lead wraps just behind the eye, then return the crimp bead to the head position and crush it with flat-nosed pliers. It is best to flatten the crimp bead gently, first from one side and then the other, as using the pliers from only one side creates a slightly wedge shaped head.
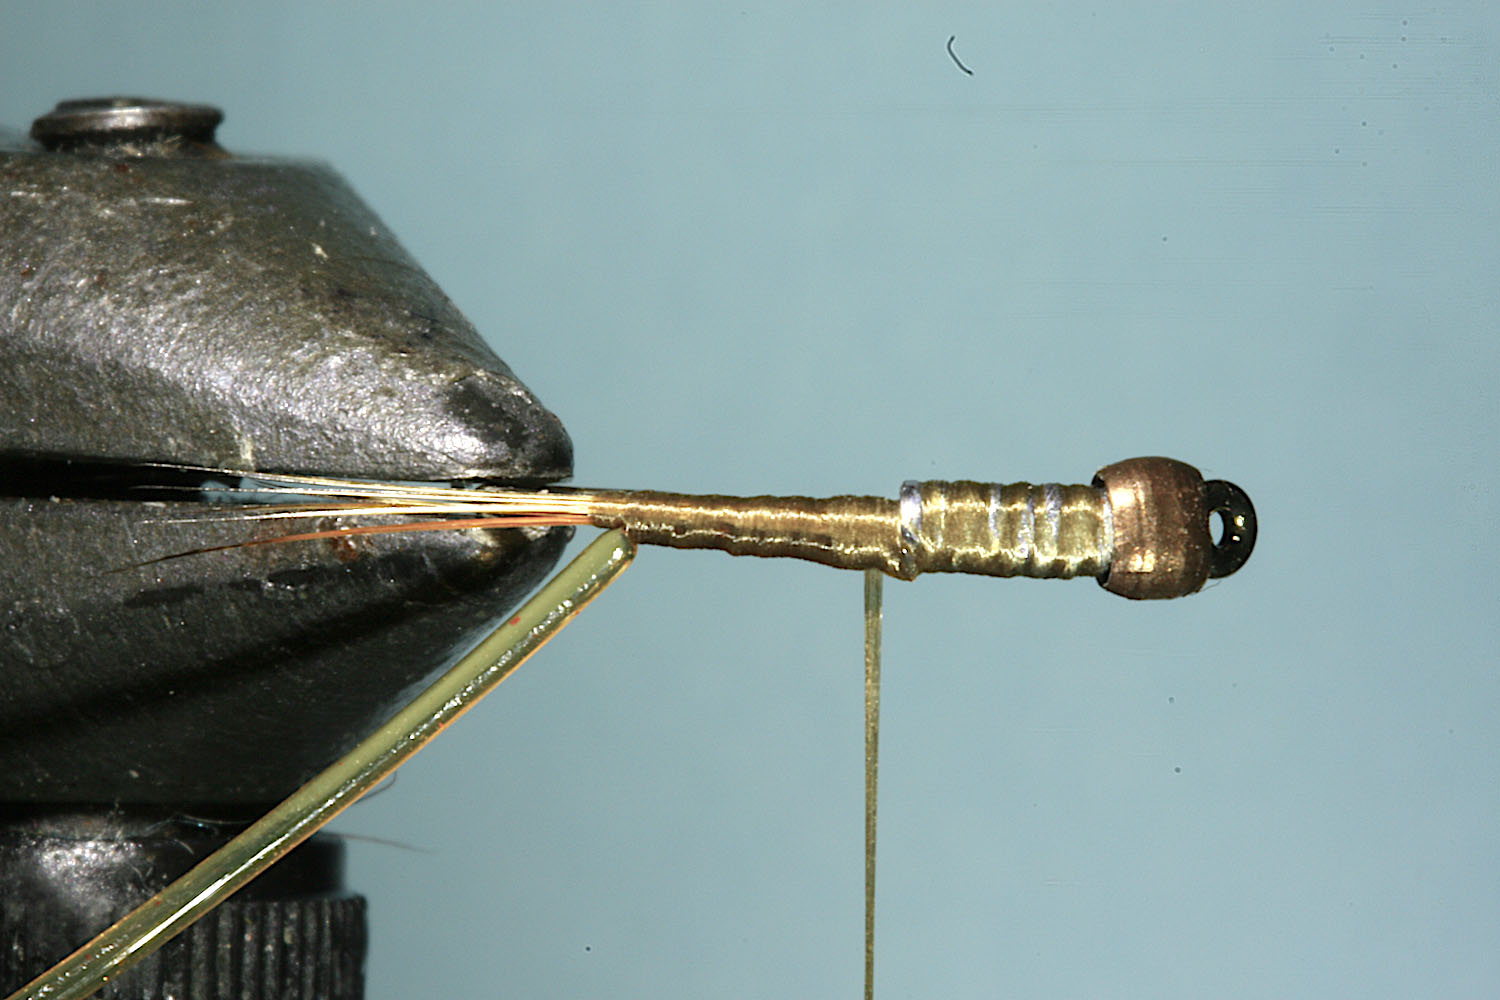
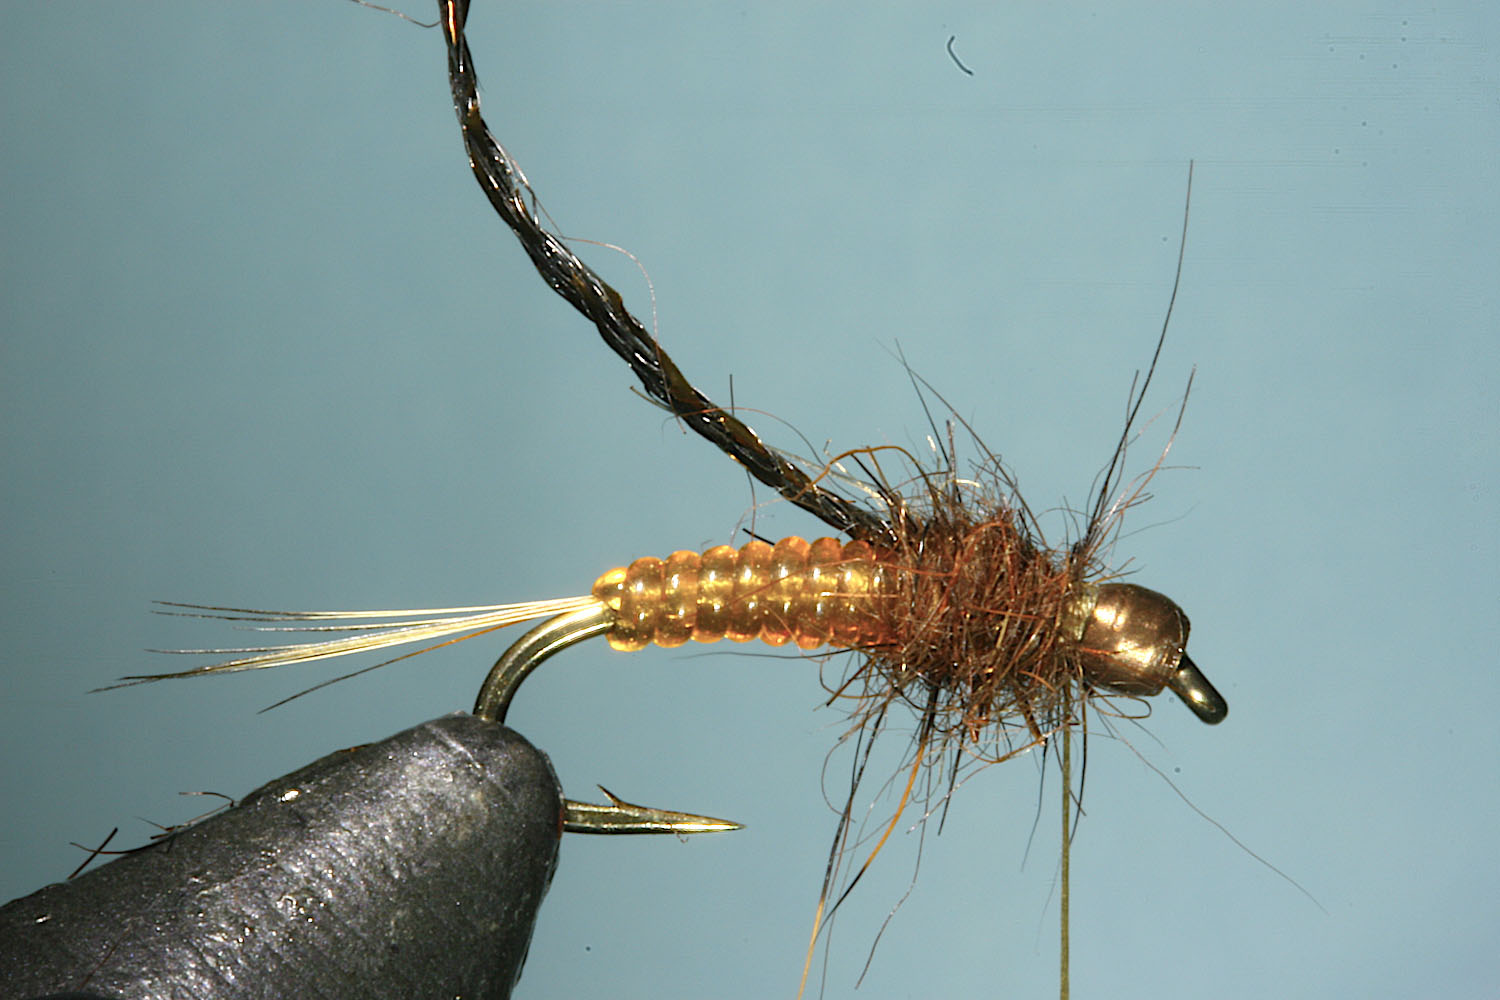
Step 4
Tie in the Stretch Cord along the near side of the hook shank, increasing tension toward the tail, to create a taper. Note that the Stretch Cord is tied in to a position approximately 0.5mm anterior to the last thread wraps securing the tail fibres. Next cover the lead wire with thread (moving fore and aft with open thread turns so as not to open up the wire turns) and then flatten the lead under-thorax with flat-nose pliers (once again squeezing gently from both sides).
Step 5
Wrap the Stretch Cord clockwise around the hook shank, stretching it considerably to make the first turn and then progressively reduce tension to create a tapered abdomen. Tie off on the near side of the hook and stretch the tag end when trimming the excess.
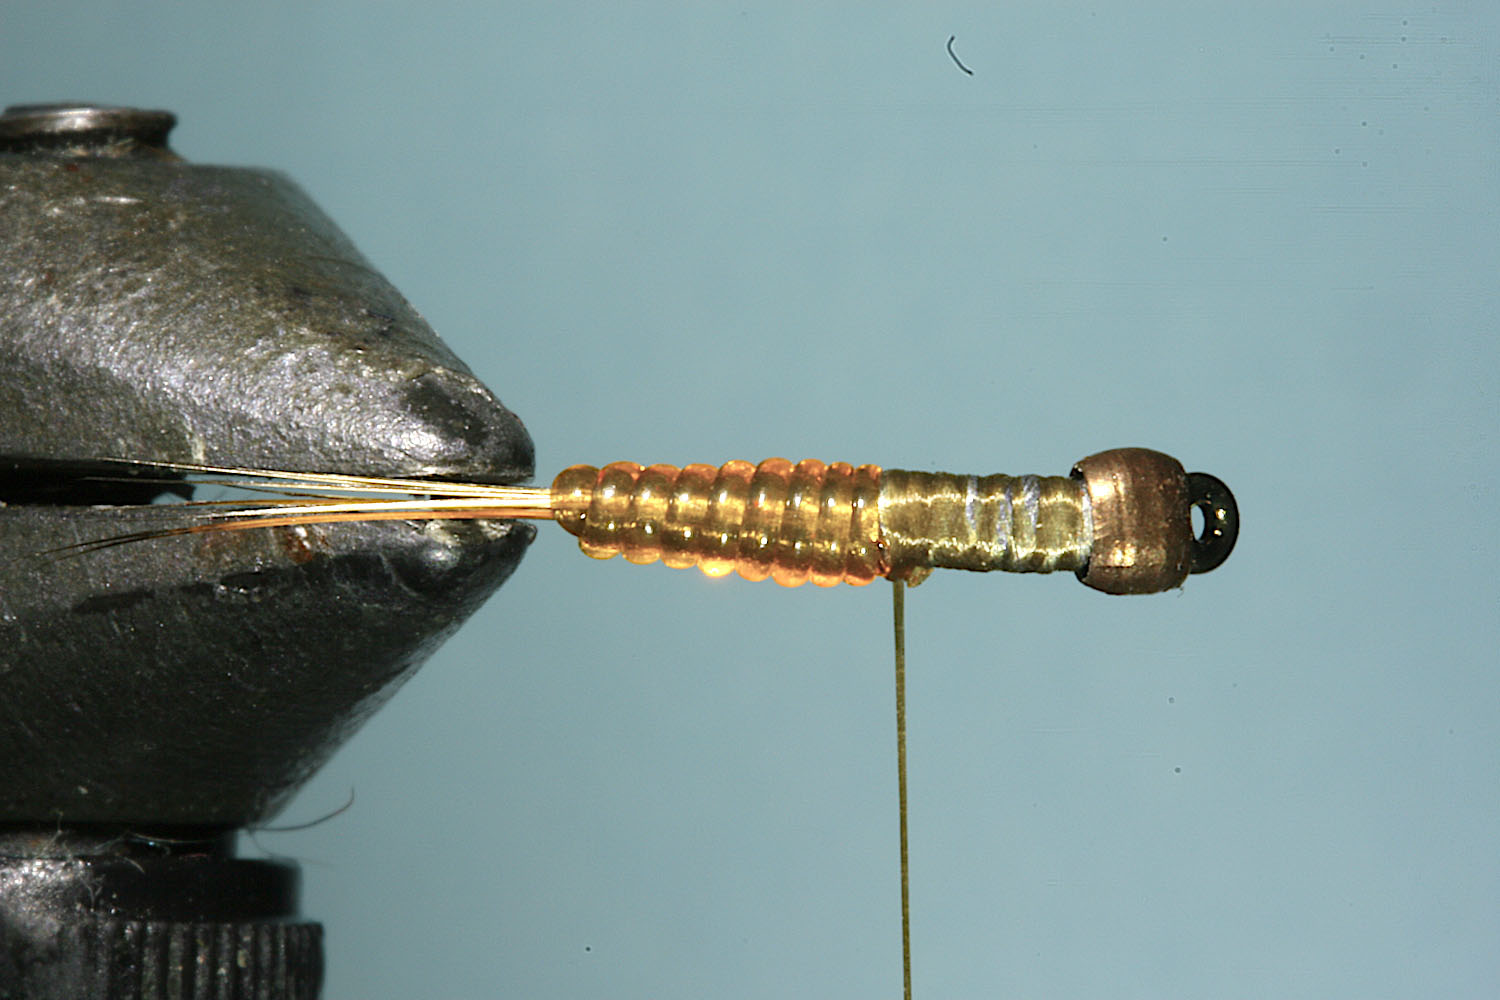
Step 6
Tie a 2cm length of ribbon atop the lead under-thorax, beginning about 1mm behind the flattened crimp. Level the under thorax with a gentle nip of the flat nose pliers.
Step 7
Twist a thin noodle of dubbing onto the thread, and starting about 0.5mm behind the bead, dub rearward to the wing case, and then forward to the starting position, creating a spiky thorax and ensuring a slight gap behind the crimp.
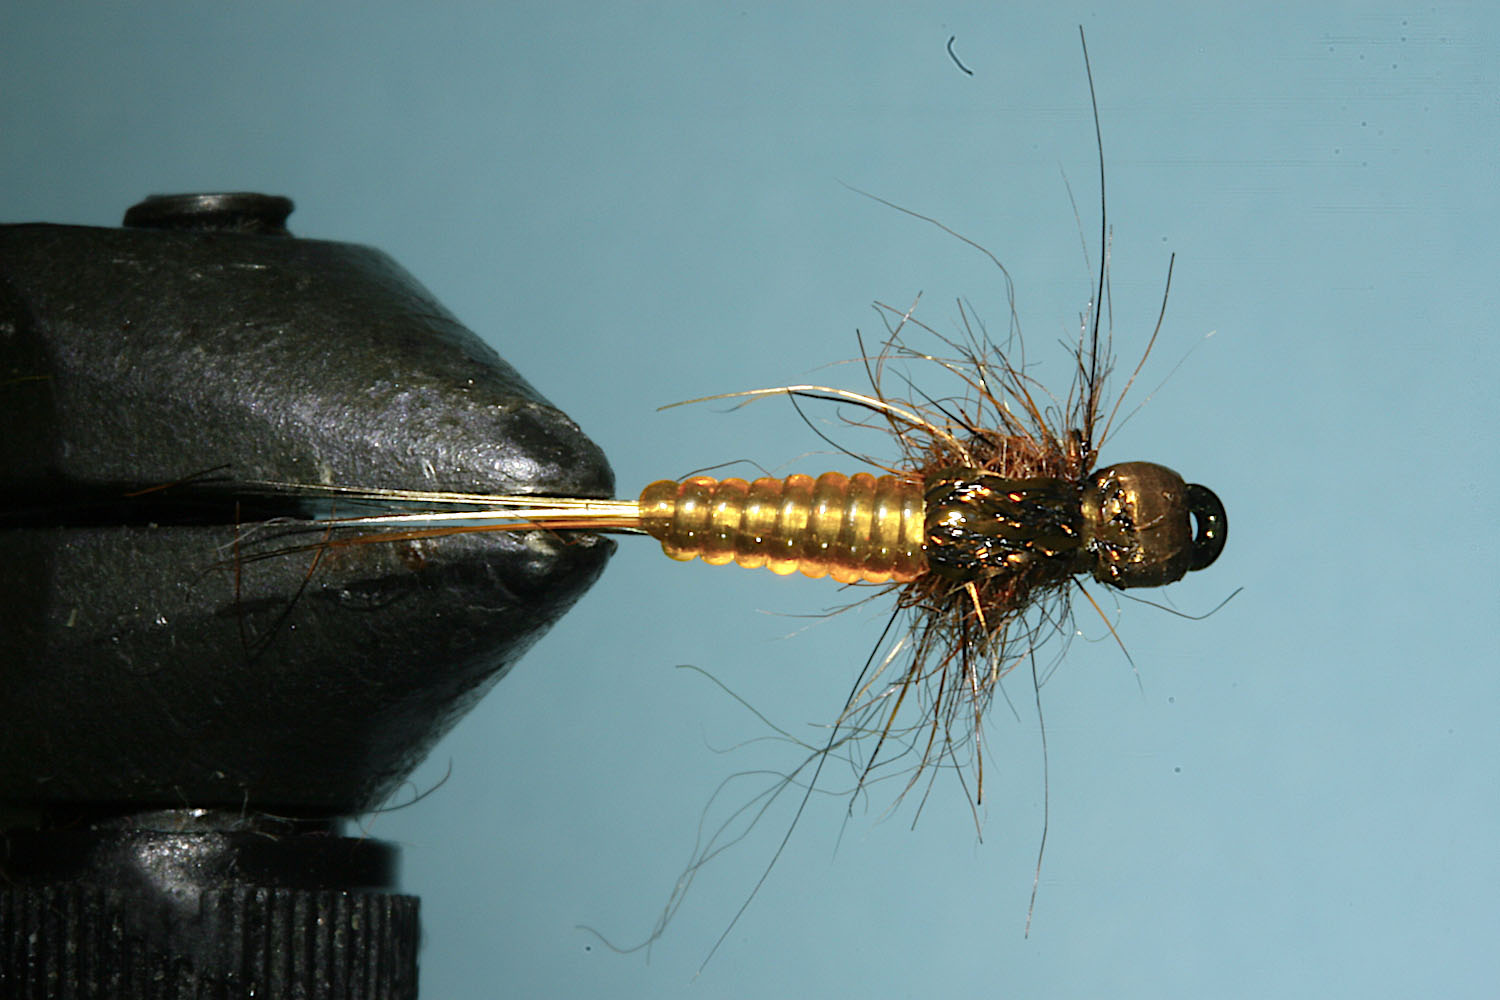
Step 8
Bring the ribbon wing case forward with the right hand, while stroking the guard hairs rearward with the thumb and index fingers of the left. Maintaining tension on the ribbon, use the left hand to secure the wing case behind the flattened crimp bead with two tight turns of thread. Tie off with two half hitches and then trim away the excess ribbon. Lastly, place a small drop of waterproof super glue on a dubbing needle or sharp tooth pick then thinly coat the wing case and dorsal surface of the thread wraps and crimp.

Step 9
With a Pantone marker (I have used brown) coat the upper surface and a third of the way down the sides of the abdomen. Then dust the midline of the dorsal surface with a darker colour (like a black Sharpie) to increase realism.

Step 10
When the ink has dried, place a small drop of Sally Hansen’s Hard as Nails on a sharp tooth pick then coat the coloured surface with one or two strokes. Avoid multiple strokes in the same area as this can remove the ink. The varnish on the shellback usually appears too thick and clumsy when first applied but will shrink as it dries, to form a realistic abdomen. Once the glue and varnish have hardened, about half an hour, gently pluck away any loose tufts of dubbing, then create a symmetrical leg pattern by teasing out or trimming guard hairs.
+ Effective Spey flies for New Zealand Trout and techniques for fishing them
+ Evolution of the Swing Minnow - A deadly Trout Spey Streamer
+ Introduction to wonders of Stretch Cord
+ Jelly Midge
+ Jelly Bloodworm and Jelly Grub
+ Jelly Caddis
+ Jelly Leg Colly
+ Jelly Bellow Minnow
+ Hot Foam Hopper
+ Hare's Mask Darter
+ Silicone Wing Cicada - Designing the Fly
+ Silicone Wing Cicada - Tying Steps
+ Gurgle Pop Minnow
+ Cutting your own Foam Cylinder